… or so the proverb goes … and it’s fair to say I’ve been procrastinating quite a bit recently.
I typically take a summer break from working on the relay computer so that I can service all the other hobbies I have on the go but also to enjoy the brief warm weather we get here in the UK. Usually come autumn time I’m back building, blogging and making videos but this year ‘summer’ has hung on … through to the end of the year no less … and it’s because I’m intentionally/unintentionally putting off getting started. What’s to blame? Other than my own lack of self control? … it’s those damn registers. Let me try and explain …
The computer is now at the stage where you can load a simple program into memory and then let the computer execute it line-by-line. Instruction wise, you can set a value in register A or B (SETAB), copy a value between any of the four registers A, B, C and D (MOVE-8) and finally perform a basic ALU operation such as add, increment, and, or, xor and so on (ALU). Way back in April I put together a video which covers the current functionality so the following might be worth a look if you’ve not seen it already:
What’s missing from the computer at the moment is the ability to branch and loop. Any program fed into the computer is executed line by line and there’s no way to jump to another part of the program, say, depending on the result of some operation. This really limits the scope of how useful any program written is going to be. Pretty much any useful computer will have the concept of branching and looping in some form and this computer is no exception.
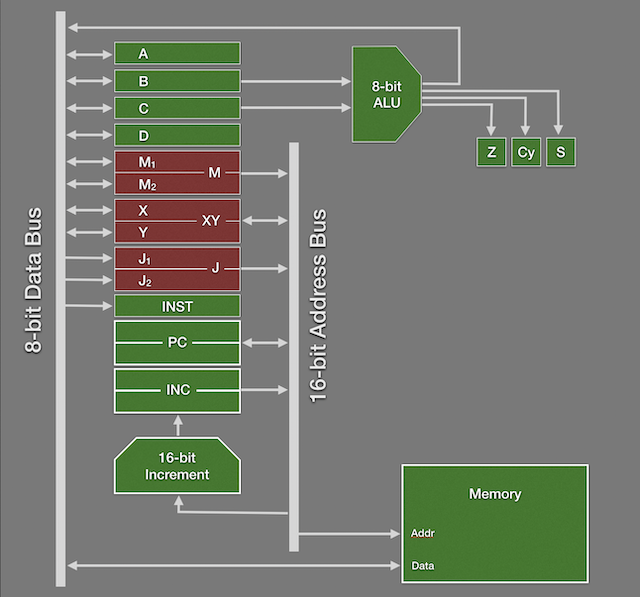
So, what’s required to get looping and branching? There’s certainly some more control circuitry required and the sequencer will need to be able to handle more complex instructions (i.e. ones that take more clock cycles to complete) but what we really need is more registers. Another six of them in fact … M1, M2, J1, J2, X and Y. Each of these registers holds an 8-bit value just like their A, B, C and D register siblings which are already built. These six new registers form pairs (M, J and XY) creating a 16-bit value from the two 8-bits (one for the upper 8-bits and one for the lower 8-bits of the 16-bit value) which is then gated to the address bus. To help visualise this a bit better here’s the overall architecture diagram taken from the video above:

To make a program loop, branch or similar we perform what’s known as a ‘jump’. This involves loading the address of the program line we should ‘jump’ to into the J register. We can then decide whether or not we need to take that jump depending on the outcome of a recent ALU operation. This where the condition registers come in (Z, Cy and S) so that we can jump if the ALU operation was zero, had the sign bit set or caused an arithmetic overflow (carry). If the jump is wanted we copy the value in the J register over to the program counter (PC) which then means the next instruction will be loaded from this new address.
The XY register is used in the scenario where after jumping somewhere else in the program you might want to jump back … XY takes a copy of the current value in the PC before the jump is taken. Jumping back therefore just requires the value in XY to be copied to the PC. This is useful when you have a small reusable ‘sub-routine’ in your program that you can jump to, execute and then jump back hence cutting down on duplication in your program.
Finally we come to the M register. This isn’t really used for branching but can become useful in loops or, more importantly, in storing and retrieving values from memory. The M register holds the address of where the value should be stored/retrieved from.
So, back to that procrastination … and it comes down to the repetitive nature of making these registers. They’re all very similar and, with the construction method I’ve been using, all as fiddly and time consuming as each other to make. That’s why I’ve been delaying getting started … I’m not good with repetitive tasks. There’s two ways out of this … either just force myself to get on with it (which hasn’t been working out all that well so far) or change the way I make these cards …
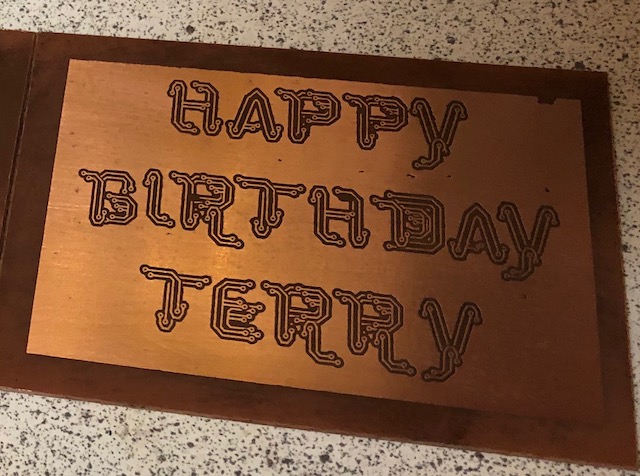
… and that’s where I’ll pick up at my next post. In the meanwhile though I’ll give you a teaser … it involves using a technique not dissimilar to the one I used to make a friend his birthday card a couple of days ago:

Happy new year everyone :)